Tuesday, October 17, 2023

Navigating the Learning Curve of Next.js: A Developer's Journey


Mastering the Next.js Learning Curve: A Developer's Guide

Welcome to the exciting world of Next.js! As a developer, embarking on a journey to learn a new framework can be both exhilarating and challenging. Next.js, a popular React framework, is renowned for its server-side rendering capabilities and flexibility. However, like any technology, mastering it comes with a learning curve. In this blog post, we'll delve into the learning curve of Next.js and how to navigate it effectively.

Navigating the Learning Curve of Next.js: A Developer's Journey


Embrace the Fundamentals

Every successful journey starts with understanding the basics. In the case of Next.js, having a solid grasp of React fundamentals is a significant advantage. If you're new to React, it's advisable to acquaint yourself with React concepts such as components, state, props, and JSX. This foundational knowledge will pave the way for a smoother learning experience with Next.js.


Getting Started with Next.js

The best way to learn is by doing. Begin your Next.js journey by setting up a project. Install Next.js, create a simple application, and run it. This hands-on approach allows you to get a feel for the framework and its file structure. Understanding the project setup and the role of critical files like pages/index.js is fundamental.


Exploring the Documentation

Next.js has comprehensive and well-structured documentation. It's a goldmine of information, covering everything from basic setup to advanced features. Take the time to read through the official documentation, understanding the core concepts, API routes, data fetching strategies, and deployment options. The documentation often includes examples that can aid your understanding.


Follow Tutorials and Guides

Tutorials and guides are invaluable resources for learning Next.js. Follow along with step-by-step tutorials that demonstrate how to build different types of applications using Next.js. By building real projects and solving real-world problems, you'll deepen your understanding and gain practical experience.


Leverage Community and Online Courses

Next.js has a vibrant and active community. Engage with this community through forums, social media, and developer communities like Stack Overflow. Participating in discussions, asking questions, and learning from others' experiences can accelerate your learning process. Additionally, consider enrolling in online courses focused on Next.js. Many platforms offer comprehensive courses tailored for beginners and advanced developers.


Experiment and Build Projects

The most effective way to solidify your understanding of Next.js is by building projects. Start with a simple project and gradually increase complexity as you gain confidence. Experiment with features like dynamic routing, data fetching, and styling to grasp their practical implementation.


Seek Guidance and Mentorship

Don't hesitate to seek guidance and mentorship from experienced developers in the Next.js ecosystem. Mentors can provide insights, answer questions, and guide you through challenges. Joining coding communities or attending meetups can connect you with potential mentors and like-minded developers.


Patience and Perseverance

Lastly, remember that learning any new technology takes time and patience. Embrace the learning curve, and don't be discouraged by challenges. Persevere through difficulties, celebrate small victories, and keep refining your skills.


In conclusion, the learning curve of Next.js is a rewarding journey that equips you with valuable skills to build powerful web applications. By embracing the fundamentals, leveraging resources, and staying persistent, you'll conquer the learning curve and become proficient in Next.js. Happy coding! 🚀

Troubleshooting "npm ERR! errno ECONNRESET" Error in Node.js or Next.js

Decoding and Resolving the 'npm ERR! errno ECONNRESET' Error in Node.js: A Troubleshooting Guide

Introduction:

If you encounter this message while running the 'npx create-next-app@latest' command or when working with Node.js and npm, you may encounter the error "npm ERR! errno ECONNRESET," indicating an issue related to network connectivity. This error commonly occurs when npm is unable to fetch packages from the npm registry due to network problems, such as being behind a proxy or having incorrect network settings. In this blog post, we'll explore the causes of this error and provide step-by-step solutions to resolve it.

How to Troubleshoot "npm ERR! errno ECONNRESET" Error in Node.js or Next.js

How to Troubleshoot "npm ERR! errno ECONNRESET" Error in Node.js or Next.js


Understanding the Error:

The error message typically appears as follows:

npm ERR! errno ECONNRESET

npm ERR! network Invalid response body while trying to fetch https://registry.npmjs.org/@next%2feslint-plugin-next: aborted

npm ERR! network This is a problem related to network connectivity.

npm ERR! network In most cases, you are behind a proxy or have bad network settings.

npm ERR! network

npm ERR! network If you are behind a proxy, please make sure that the 'proxy' config is set properly.

This error suggests a problem with the network connection during the npm installation process.


Troubleshooting "npm ERR! errno ECONNRESET" Error in Node.js or Next.js

Troubleshooting "npm ERR! errno ECONNRESET" Error in Node.js or Next.js


Solutions:

1. Check Network Connectivity:

Verify that your internet connection is stable and not interrupted. Sometimes, a temporary network issue can cause this error.

2. Verify Proxy Settings:

If you are behind a proxy, ensure that your proxy settings are correctly configured for npm. You can set the proxy using the npm config command:

npm config set proxy http://your_proxy:your_port
npm config set https-proxy http://your_proxy:your_port

3. Clear npm Cache:

Clear the npm cache to ensure that any cached data causing the issue is removed:

npm cache clean --force

4. Update npm:

Ensure you are using the latest version of npm:

npm install -g npm@latest

5. Check Firewall and Security Settings:

Verify that your firewall or security software is not blocking npm. Temporarily disable the firewall or adjust its settings to allow npm to access the network.

6. Reinstall npm:

As a last resort, uninstall npm globally and reinstall it:

npm uninstall -g npm
npm install -g npm@latest

Conclusion:

The "npm ERR! errno ECONNRESET" error can be frustrating, but with the steps outlined in this post, you should be able to diagnose and resolve the issue. Always ensure you have a stable network connection and double-check your proxy and network settings. Additionally, keeping npm up to date is crucial for a smooth development experience. Happy coding!

Wednesday, July 5, 2023

Unhandled Runtime Error : Invalid src prop : NextJs : Cloudinary : UploadImages : cldUploadWidget


If you are updating <cldUploadWidget/> cloudinary website upload image components or other site components and get this error then the solution is simple just amend the nextjs.config.js file in your project make the following changes and your project will work 


Here is the code for the nextjs.config.js file just replace the file

/** @type {import('next').NextConfig} */

const nextConfig = {

    images: {

        domains: [

            'res.cloudinary.com'

        ]

    }

}


module.exports = nextConfig


Sunday, July 2, 2023

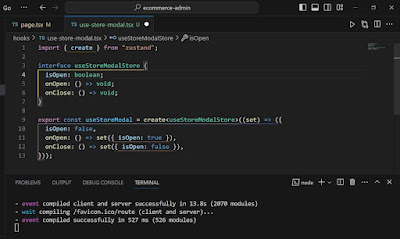
Type 'void' is not assignable to type '{}'.ts(2322) TypeScript Error Fixed


Error Message

Type 'void' is not assignable to type '{}'.ts(2322)

use-store-modal.tsx(5, 11): The expected type comes from the return type of this signature.

use-store-modal.tsx(11, 11): Did you mean to mark this function as 'async'?


Error is shown in the picture code 

TypeScript error ts (2322)
TypeScript error ts (2322) shown

 Error is shown in detail

TypeScript error ts (2322)
Detail TypeScript error ts (2322) 

Solution shown in the picture code just convert the function into void

TypeScript error ts (2322)
TypeScript error ts (2322) Solution


Or follow the procedure given below

The error message indicates that there is an issue with the return type of a function in the use-store-modal.tsx file. It seems that the function is expected to return an object, but it is returning void instead.

To fix this error, you can update the function to explicitly specify the return type as an object or modify the implementation to return an object with the expected properties. Here's an example of how you can update the code:


import { useState } from 'react';


export const useStoreModal = () => {

  const [isOpen, setIsOpen] = useState(false);


  const openModal = () => {

    setIsOpen(true);

  };


  const closeModal = () => {

    setIsOpen(false);

  };


  return {

    isOpen,

    openModal,

    closeModal,

  };

};

In this example, the useStoreModal function returns an object with three properties: isOpen, openModal, and closeModal. Ensure that the return type matches the expected type in the consuming component to resolve the error.

Want to Learn  Next.js, TypeScript, Tailwind CSS then watch this video https://youtu.be/rftadFuDmC8

Learn Next.js Typescript
Learn to Build a Calculator App with Next.js, TypeScript, Tailwind CSS, and Deploy on Vercel


Uncaught Error: Element type is invalid: Mixed up default and named imports

Uncaught Error: Element type is invalid: expected a string (for built-in components) or a class/function but got: undefined

Exact Error Wording is given below:-

- error Error: Element type is invalid: expected a string (for built-in components) or a class/function (for 

composite components) but got: undefined. You likely forgot to export your component from the file it's defined in, or you might have mixed up default and named imports.

The error message you're encountering typically occurs when there is an issue with exporting or importing components correctly. Here are a few things you can check to resolve this error:

Solutions - 1

First of all if you have copy the code from other source and paste it into your code and all the imports are pasted, then remove all the imports and manually imports all components.

Solutions - 2
      
Make sure you are exporting the component correctly from the file where it's defined. Check if you have added the export keyword before the component declaration. For example:

export const MyComponent = () => {
  // Component code here
};

Verify that you are importing the component correctly in the file where you intend to use it. Double-check the import statement and ensure that the path to the component file is correct. Also, make sure you are using the correct import syntax. For example:

import { MyComponent } from './path/to/component';

Ensure that the component name is spelled correctly and matches the exported component name in the file where it's defined. Watch out for typos or inconsistencies in the component name.

If you are using a default export in the component file, make sure you import it using the correct syntax. For example:

import MyComponent from './path/to/component';

By reviewing these points and ensuring the correct exporting and importing of your components, you should be able to resolve the "Element type is invalid" error.

Want to Learn  Next.js, TypeScript, Tailwind CSS then watch this video https://youtu.be/rftadFuDmC8

Learn Next.js Typescript
Learn to Build a Calculator App with Next.js, TypeScript, Tailwind CSS, and Deploy on Vercel


Friday, June 30, 2023

How to Reload Visual Studio Code without closing it

 To reload Visual Studio Code, you can follow these steps:


1. Press Ctrl + Shift + P (Windows/Linux) or Cmd + Shift + P (Mac) to open the Command Palette.

or Go into setting and click Command Palette.

vs code setting
VS Code Setting


VS code Command Pallet
VS Code Command Pallet


2. In the Command Palette, type "Reload Window" and select the "Developer: Reload Window" option.


VS Code Developer Reload


Alternatively, you can use the keyboard shortcut Ctrl + R (Windows/Linux) or Cmd + R (Mac) to reload the window.


Visual Studio Code will restart and reload all the open files and extensions.


Please note that reloading the window will close any unsaved changes, so make sure to save your work before performing a reload.

Want to Learn  Next.js, TypeScript, Tailwind CSS then watch this video https://youtu.be/rftadFuDmC8

Learn Next.js Typescript
Learn to Build a Calculator App with Next.js, TypeScript, Tailwind CSS, and Deploy on Vercel

Thursday, June 29, 2023

Next Themes React Alert Dialog React Hot Toast Next Share Errors and Installations

Cannot find module '@radix-ui/react-alert-dialog' or its corresponding type declarations.ts(2307)

 The error message suggests that the module @radix-ui/react-alert-dialog is not found in your project. To resolve this issue, you can follow these steps:

Make sure you have installed the necessary dependencies by running the following command in your project directory:


npm install @radix-ui/react-alert-dialog

Verify that the package is successfully installed and listed as a dependency in your package.json file.

Check if you have imported the module correctly in your code. Double-check the import statement in the file where you're using @radix-ui/react-alert-dialog:


import { AlertDialog } from '@radix-ui/react-alert-dialog';

Ensure that the import statement is accurate and matches the package's correct name.


If the issue persists, try deleting your node_modules folder and reinstalling all dependencies by running the following commands:


rm -rf node_modules

npm install

This will remove the existing dependencies and reinstall them based on the information in your package.json file.

If you still encounter the error after following these steps, please provide more details about your project setup, including your package.json file and the specific code file where you're using @radix-ui/react-alert-dialog.


Cannot find module 'react-hot-toast' or its corresponding type declarations.ts(2307)

 The error message suggests that the module react-hot-toast is not found in your project. To resolve this issue, you can follow these steps:

Make sure you have installed the necessary dependencies by running the following command in your project directory:

npm install react-hot-toast

Verify that the package is successfully installed and listed as a dependency in your package.json file.

Check if you have imported the module correctly in your code. Double-check the import statement in the file where you're using react-hot-toast:

import { toast } from 'react-hot-toast';

Ensure that the import statement is accurate and matches the package's correct name.

If the issue persists, try deleting your node_modules folder and reinstalling all dependencies by running the following commands:

rm -rf node_modules

npm install

This will remove the existing dependencies and reinstall them based on the information in your package.json file.

If you still encounter the error after following these steps, please provide more details about your project setup, including your package.json file and the specific code file where you're using react-hot-toast.

Cannot find module 'next-themes' or its corresponding type declarations.ts(2307)

 The error message suggests that the module next-themes is not found in your project. To resolve this issue, you can follow these steps:


Make sure you have installed the necessary dependencies by running the following command in your project directory:


npm install next-themes

Verify that the package is successfully installed and listed as a dependency in your package.json file.

Check if you have imported the module correctly in your code. Double-check the import statement in the file where you're using next-themes:


import { ThemeProvider } from 'next-themes';

Ensure that the import statement is accurate and matches the package's correct name.

If the issue persists, try deleting your node_modules folder and reinstalling all dependencies by running the following commands:

rm -rf node_modules

npm install

This will remove the existing dependencies and reinstall them based on the information in your package.json file.

If you still encounter the error after following these steps, please provide more details about your project setup, including your package.json file and the specific code file where you're using next-themes.

Cannot find module 'next-share' or its corresponding type declarations.ts(2307)

 The error message suggests that the module next-share is not found in your project. To resolve this issue, you can follow these steps:

Make sure you have installed the necessary dependencies by running the following command in your project directory:

npm install next-share

Verify that the package is successfully installed and listed as a dependency in your package.json file.

Check if you have imported the module correctly in your code. Double-check the import statement in the file where you're using next-share:


import { ShareButton } from 'next-share';

Ensure that the import statement is accurate and matches the package's correct name.

If the issue persists, try deleting your node_modules folder and reinstalling all dependencies by running the following commands:


rm -rf node_modules

npm install

This will remove the existing dependencies and reinstall them based on the information in your package.json file.

If you still encounter the error after following these steps, please provide more details about your project setup, including your package.json file and the specific code file where you're using next-share.

Cannot find module '@/config' or its corresponding type declarations.ts(2307)

 The error message indicates that the module @/config or its corresponding type declarations are not found in your project. The @ symbol typically represents an alias or shortcut to a specific directory in your project.

To resolve this issue, you can follow these steps:

Verify that you have the @/config module or file present in your project directory. Check if the file exists at the specified location src/config or wherever you have defined the alias @ in your project.

If the @/config file is missing, create a new file named config.ts (or any appropriate name) in the specified directory (src/config) or in the directory associated with the @ alias. Inside the config.ts file, define the necessary configurations or export the required variables.


Example config.ts file:


export const API_URL = 'https://api.example.com';

export const API_KEY = 'your-api-key';

// Add other configuration variables as needed

Make sure you have configured the alias @ in your project's build tool (e.g., webpack, TypeScript paths). This alias should point to the appropriate directory (src in this case) to resolve module imports correctly.

In the file where you're trying to import @/config, ensure that you have the correct import statement:


import { API_URL, API_KEY } from '@/config';

Adjust the import path based on the actual location of the config.ts file and the configured alias in your project.


If you're using a TypeScript project, ensure that you have the necessary type declarations for the @/config module. You may need to create a corresponding config.d.ts file or add type definitions directly in the config.ts file.


Example config.d.ts file:


export const API_URL: string;

export const API_KEY: string;

By following these steps, you should be able to resolve the "Cannot find module" error related to @/config in your project.

Want to Learn  Next.js, TypeScript, Tailwind CSS then watch this video https://youtu.be/rftadFuDmC8

Learn Next.js Typescript
Learn to Build a Calculator App with Next.js, TypeScript, Tailwind CSS, and Deploy on Vercel

NextJS NPM Error Failed to compile Import trace for requested module: Build Process Error npm ERR! Fixed with three solutions

Error

Failed to compile

./src/components/card/Card.tsx:4:0

Module not found: Can't resolve 'react-star-rating-component'

  2 | import Image from "next/image";

  3 | import Link from "next/link";

> 4 | import StarRatingComponent from "react-star-rating-component";

  5 | import { Product } from "@/types/products";

  6 | import { urlForImage } from "@/lib/sanityClient";

  7 | import CardActions from "./CardActions";


https://nextjs.org/docs/messages/module-not-found


Import trace for requested module:

./src/components/productList/ProductList.tsx

This error occurred during the build process and can only be dismissed by fixing the error.

NextJS Error Failed to Compile Example
NextJS NPM Error


Solution

The error message indicates that the module react-star-rating-component could not be found. It seems that the package is not installed in your project, which is causing the error during the build process.


To resolve this issue, you can follow these steps:


Make sure you have Node.js and npm installed on your machine.


Open your project's root directory in the terminal.


Run the following command to install the react-star-rating-component package:


npm install react-star-rating-component

Wait for the installation to complete. npm will download and install the package along with its dependencies.

Once the installation is finished, try running your project again. The error should no longer occur, as the react-star-rating-component package is now installed and available for use.

Make sure to also check if the package is required in any other files within your project and install any other missing packages if necessary.

If you still encounter any issues or error messages, please provide the complete error message or any additional details for further assistance.


If it gives still problem and give error like this

npm ERR! code ERESOLVE

npm ERR! ERESOLVE unable to resolve dependency tree

npm ERR!

npm ERR! While resolving: hackathone1@0.1.0

npm ERR! Found: react@18.2.0

npm ERR! node_modules/react

npm ERR!   react@"18.2.0" from the root project

npm ERR!

npm ERR! Could not resolve dependency:

npm ERR! peer react@"^16.2.0" from react-star-rating-component@1.4.1

npm ERR! node_modules/react-star-rating-component

npm ERR!   react-star-rating-component@"*" from the root project

npm ERR!

npm ERR! Fix the upstream dependency conflict, or retry

npm ERR! this command with --force or --legacy-peer-deps

npm ERR! to accept an incorrect (and potentially broken) dependency resolution.

npm ERR!

npm ERR!

npm ERR! For a full report see:

npm ERR! C:\Users\Hamada Salim G Trd\AppData\Local\npm-cache\_logs\2023-06-29T08_47_57_302Z-eresolve-report.txt      


npm ERR! A complete log of this run can be found in:

npm ERR!     C:\Users\Hamada Salim G Trd\AppData\Local\npm-cache\_logs\2023-06-29T08_47_57_302Z-debug-0.log"

 The error message you provided suggests that there is a dependency conflict between the react version in your project (18.2.0) and the required peer dependency of react-star-rating-component (^16.2.0). This conflict prevents the package from being resolved and installed successfully.


To resolve this issue, you have a few options:

  1.  Update the version of react-star-rating-component to a version that is compatible with React 18. You can check the package's documentation or GitHub repository to see if there is a newer version available that supports React 18. If so, update the package version in your project's package.json file and re-run the installation command.
  2. Use the --legacy-peer-deps flag when running the installation command. This flag allows npm to install packages even when there are peer dependency conflicts. Run the following command:

    npm install react-star-rating-component --legacy-peer-deps

    Note that using --legacy-peer-deps may lead to potential compatibility issues, so it's recommended to try option 1 first.

  3. Manually resolve the dependency conflict by updating the required version of react-star-rating-component to match the version of React in your project. You can do this by modifying the package.json file and specifying the version explicitly. For example:


    "dependencies": {

      "react-star-rating-component": "^18.2.0"

    }


After making the change, run npm install again to install the package.

Try one of these options and see if it resolves the issue. If you encounter any further errors or need additional assistance, please let me know.

Want to Learn  Next.js, TypeScript, Tailwind CSS then watch this video https://youtu.be/rftadFuDmC8

Learn Next.js Typescript
Learn to Build a Calculator App with Next.js, TypeScript, Tailwind CSS, and Deploy on Vercel

Wednesday, June 28, 2023

How to Install Node.js and Choose the Right Version: LTS or Current for Windows, macOS, and Linux

 To install Node.js, you can follow these steps:


Visit the official Node.js website: Go to the official Node.js website at https://nodejs.org.


Choose the appropriate version: Node.js offers two major versions: LTS (Long-Term Support) and Current. For most users, it is recommended to install the LTS version, as it provides stability and long-term support. Select the LTS version unless you have specific reasons to choose the Current version.


Select the operating system: On the Node.js website, you'll find options for different operating systems (Windows, macOS, and Linux). Choose the version that matches your operating system.


Download the installer: Once you've selected the appropriate version and operating system, click on the download button to start downloading the Node.js installer.


Run the installer: After the download is complete, locate the downloaded installer file and run it. Follow the on-screen instructions to proceed with the installation.


Verify the installation: Once the installation is complete, open a command prompt or terminal and run the following command to verify that Node.js and npm (Node Package Manager) are installed:


node -v

npm -v

These commands will display the installed version of Node.js and npm, respectively. If you see the version numbers, it means Node.js is installed successfully.


Node.js is now installed on your computer, and you can start using it to run JavaScript applications, build servers, and more.

Cannot find module '@reduxjs/toolkit' or its corresponding type declarations.ts(2307)

 The error message "Cannot find module '@reduxjs/toolkit' or its corresponding type declarations" suggests that the @reduxjs/toolkit module is not installed in your project or the TypeScript type declarations for the module are missing.

To resolve this issue, you can follow these steps:

Install the @reduxjs/toolkit module by running the following command in your project's root directory:


npm install @reduxjs/toolkit

This command will install the @reduxjs/toolkit module and add it as a dependency in your package.json file.

If you still encounter the TypeScript declaration error, make sure you have the required TypeScript type declarations installed for @reduxjs/toolkit.

In most cases, the type declarations for @reduxjs/toolkit should be automatically installed when you install the module. However, if they are missing, you can try installing the type declarations explicitly by running the following command:


npm install @types/react-redux

This command will install the TypeScript type declarations for @reduxjs/toolkit and its dependencies.

After installing the module and the corresponding type declarations, rebuild your TypeScript project. The error related to missing type declarations for @reduxjs/toolkit should no longer appear.

If you still encounter the error after following these steps, make sure you have the latest versions of npm and node.js installed and that your project's dependencies are properly installed. Also, check your project's configuration and make sure that you have the necessary setup for using @reduxjs/toolkit with TypeScript, such as proper module resolution and TypeScript configuration settings.

TypeScript Error: Cannot find module 'react-redux' or its corresponding type declarations.ts(2307)

 The error message "Cannot find module 'react-redux' or its corresponding type declarations" suggests that the react-redux module is not installed in your project or the TypeScript type declarations for the module are missing.

To resolve this issue, you can follow these steps:

Install the react-redux module by running the following command in your project's root directory:


npm install react-redux

This command will install the react-redux module and add it as a dependency in your package.json file.

If you still encounter the TypeScript declaration error, make sure you have the required TypeScript type declarations installed for react-redux.

In most cases, the type declarations for react-redux should be automatically installed when you install the module. However, if they are missing, you can try installing the type declarations explicitly by running the following command:


npm install @types/react-redux

This command will install the TypeScript type declarations for react-redux.

After installing the module and the corresponding type declarations, rebuild your TypeScript project. The error related to missing type declarations for react-redux should no longer appear.

If you still encounter the error after following these steps, make sure you have the latest versions of npm and node.js installed and that your project's dependencies are properly installed. Also, check your project's configuration and make sure that you have the necessary setup for using react-redux with TypeScript, such as proper module resolution and TypeScript configuration settings.

TypeScript Error : Cannot find module 'canvas-confetti' or its corresponding type declarations.ts(2307)

 The error message "Cannot find module 'canvas-confetti' or its corresponding type declarations" indicates that the canvas-confetti module is not installed in your project or the TypeScript type declarations for the module are missing.

To resolve this issue, you can follow these steps:

Install the canvas-confetti module by running the following command in your project's root directory:

npm install canvas-confetti

If you still encounter the TypeScript declaration error, you may need to install the type declarations for canvas-confetti. TypeScript relies on type declarations to understand the shape of a module. In this case, canvas-confetti may not have official type declarations available.

To address this, you can create a custom declaration file in your project to provide TypeScript with the necessary type information. Here's how you can create the declaration file:

Create a new file called canvas-confetti.d.ts in your project's root directory (or any appropriate location for your TypeScript declaration files).

Add the following code to the canvas-confetti.d.ts file:


declare module 'canvas-confetti' {

  export default function create(options?: any): any;

}

This declaration file tells TypeScript that the canvas-confetti module exports a default function, allowing TypeScript to understand and compile the module without any type errors.

After creating the declaration file, try rebuilding your TypeScript project. The error related to missing type declarations for canvas-confetti should no longer appear.

Please note that the custom declaration file provided above is a basic declaration and may not include all the specific types for the canvas-confetti module. If you need more detailed and accurate type information, you can consider manually creating or finding a more comprehensive declaration file for canvas-confetti.

Also, ensure that you have the latest versions of npm and node.js installed and that your project's dependencies are properly installed.

How to integrate Nextjs project to Sanity with TypeScript

 To integrate a Next.js project with Sanity using TypeScript, you can follow these steps:

Create a new Next.js project with TypeScript by running the following command in your terminal:

npx create-next-app@latest --ts

Install the required packages for integrating Sanity with Next.js:

npm install @sanity/client react-query

Configure Sanity:

Create a new Sanity project or use an existing one. You can sign up for a free account on the Sanity website (https://www.sanity.io/) if you don't have one already.

Set up your Sanity schema and create the necessary data structures for your project.

Create a sanity.ts file in your project's root directory and add the following code:

import { createClient, SanityClient } from '@sanity/client';

const sanityClientOptions = {

  projectId: 'YOUR_PROJECT_ID',

  dataset: 'YOUR_DATASET',

  useCdn: true, // Enable this for production to use the CDN

};

const sanityClient: SanityClient = createClient(sanityClientOptions);


export default sanityClient;

Replace 'YOUR_PROJECT_ID' and 'YOUR_DATASET' with your actual Sanity project ID and dataset name.

Create a utility function to fetch data from Sanity. Create a sanityFetch.ts file in your project's root directory and add the following code:

import sanityClient from './sanity';

export async function fetchSanityData(query: string, params?: Record<string, any>) {

  const response = await sanityClient.fetch(query, params);

  return response;

}

Start building your Next.js pages and components. You can use the fetchSanityData function to fetch data from Sanity and use it in your components.

Here's an example of how you can fetch data from Sanity in a Next.js page:


import { fetchSanityData } from '../path/to/sanityFetch';


export async function getStaticProps() {

  const query = `*[_type == "post"]{title, body}`;


  const data = await fetchSanityData(query);


  return {

    props: {

      posts: data,

    },

  };

}


function Home({ posts }) {

  return (

    <div>

      {posts.map((post) => (

        <div key={post._id}>

          <h2>{post.title}</h2>

          <p>{post.body}</p>

        </div>

      ))}

    </div>

  );

}


export default Home;

This example demonstrates how to fetch a list of posts from Sanity and render them on the homepage. Adjust the query and component code according to your Sanity schema and data structure.

Start your Next.js development server by running the following command in your terminal:

npm run dev

Your Next.js project should now be integrated with Sanity, and you can start fetching and displaying data from Sanity in your Next.js pages and components.

Remember to replace 'YOUR_PROJECT_ID' and 'YOUR_DATASET' with your actual Sanity project ID and dataset name in the sanity.ts file.

Note: Make sure you have the necessary access tokens and permissions set up in your Sanity project to allow API access.

How AI (Artifical Inteligence) is Revolutionizing Grief Support: The Story of Digital Legacies and Memory Preservation

When James Vlahos learned his father was diagnosed with terminal cancer in 2016, he was heartbroken. Living in Oakland, California, James ch...